MySQL数据库简介
MySQL早期由瑞典的MySQL AB开发与推广,后来先后被SUN和Oracle公司所收购,成为当今最流行的开源数据库。与其他商用数据库比较,MySQL在功能上存在一定程度的不足,但是这并不影响其受欢迎的程度。因为基本功能够用而且开源免费,可以大大降低运营成本,所以MySQL在世界范围内的大中小型企业中得到了广泛的应用。MySQL主要用于存储业务过程中产生的各类业务数据。
CentOS 7上MySQL 8.0 rpm包安装
(1)前提条件
假设当前CentOS 7已经配置好了网络或本地yum源,考虑到安全稳定性,通常作为服务器用的Linux普遍采用最小安装方式,即只安装必须要用的软件包,这样可以节约系统资源和降低不需要的应用程序所携带的潜在安全风险。MySQL8.0软件的安装过程需要用到诸如Perl语言等的一些相关软件包。
(2)下载针对CentOS 7的MySQL 8.0 rpm包
下载MySQL的网址是https://www.mysql.com/downloads/,进入页面后单击MySQL社区版链接,如下图所示。

进入页面后单击“MySQL Community Server”,如下图所示。

进入页面后,操作系统选择“Red Hat Enterprice Linux/Oracle Linux”,操作系统版本选择“Red Hat Enterprice Linux 7/Oracle Linux 7 (x86,64-bit)”,如下图所示。

在当前页面下方可以看到MySQL 8.0对应的“rpm bundle”下载链接,单击“Download”即可,如下图所示。

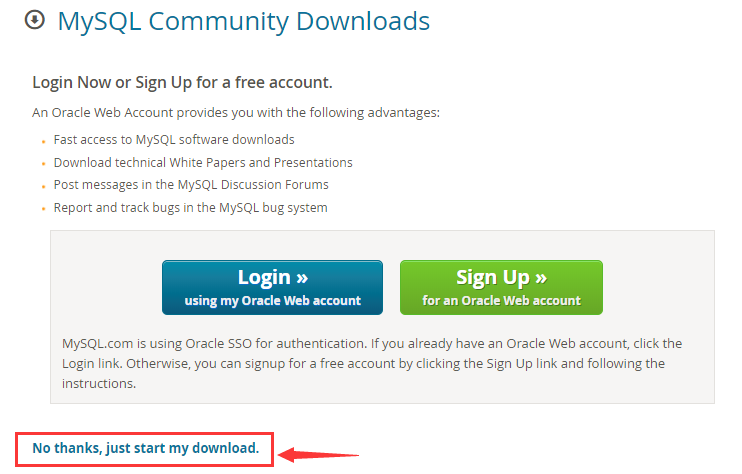
页面跳转到如下图所示页面,单击“No thanks, just start my download.”,即可开始下载MySQL 8.0 rpm包安装程序。

(3)安装步骤
①输入setenforce 0,禁用selinux。通常MySQL运行时需要禁用selinux功能,否则可能会影响MySQL数据库服务的正常运行。
②上传MySQL软件包到CentOS 7系统。通常使用root用户操作,使用rz命令,将MySQL 8.0 rpm软件安装包mysql-8.0.19-1.el7.x86_64.rpm-bundle.tar上传到CentOS 7的/root目录中。
③输入tar -xvf mysql-8.0.19-1.el7.x86_64.rpm-bundle.tar,还原安装包中的rpm包。
④输入yum install mysql-community-{libs,client,common,server}-*.rpm,安装软件。
⑤输入systemctl start mysqld,启动mysql数据库初始化。
(4)首次登录准备工作
至此,MySQL的软件已经安装完毕,然后需要启动MySQL服务,进行数据文件的初始化工作,步骤如下:
①输入grep -i "temporary password" /var/log/mysqld.log,抓取临时登录密码。

②运行mysql_secure_installation初始化MySQL,会有交互式的输出如下,参见中文的注释内容:
[root@CentOS7-7 bin]# mysql_secure_installation
Securing the MySQL server deployment.
Enter password for user root: 输入临时登录密码
The 'validate_password' component is installed on the server.
The subsequent steps will run with the existing configuration
of the component.
Using existing password for root.
Estimated strength of the password: 100
Change the password for root ? ((Press y|Y for Yes, any other key for No) : y 改变root密码选“y”
New password: 输入新密码,要求不少于8位,包括大写字母、小写字母、数字和特殊符号
Re-enter new password: 重新输入新密码
Estimated strength of the password: 100
#是否继续使用新的密码,选“y”
Do you wish to continue with the password provided?(Press y|Y for Yes, any other key for No) : y
By default, a MySQL installation has an anonymous user,
allowing anyone to log MySQL without having to have
a user account created for them. This is intended only for
testing, and to make the installation go a bit smoother.
You should remove them before moving a production
environment.
# 去除匿名用户吗?选“y”
Remove anonymous users? (Press y|Y for Yes, any other key for No) : y
Success.
Normally, root should only be allowed to connect from
'localhost'. This ensures that someone cannot guess at
the root password from the network.
# 不允许root用户远程登录?选“y”
Disallow root login remotely? (Press y|Y for Yes, any other key for No) : y
Success.
By default, MySQL comes with a database named 'test' that
anyone can access. This is also intended only for testing,
and should be removed before moving a production
environment.
#删除test数据库吗?选“y”
Remove test database and access to it? (Press y|Y for Yes, any other key for No) : y
- Dropping test database...
Success.
- Removing privileges on test database...
Success.
Reloading the privilege tables will ensure that all changes
made so far will take effect immediately.
# 重新加载授权表到内存,选“y”
Reload privilege tables now? (Press y|Y for Yes, any other key for No) : y
Success.
# 至此成功初始化用户
All done!
[root@CentOS7-7 bin]#
③输入mysql -uroot -p,然后输入新的密码,连接MySQL数据库。成功登录MySQL数据库后,如下图所示,可以使用select version();语句查看MySQL版本号。


 2021-03-22 16:01:16


 [2023-08-17]
 1652
1652


