

 2021-07-26 14:20:56
之前所介绍的rpm安装、yum安装针对的都是rpm包的安装过程,但是在Linux中还有一种软件安装包是非rpm格式的,称为源码包。源码包大多由非Linux官方的公司研发并推出,发布时并未打包成rpm格式,有些甚至接近于源代码格式。
Linux的GUI图形界面与Windows相似,都可以通过浏览器访问页面,点击下载软件。但是在Linux的字符界面中,常用wget url命令直接下载软件,url即软件的下载地址。例如,wget http://vault.centos.org/7.4.1708/isos/x86_64/CentOS-7-x86_64-DVD-1708.iso。
若下载的安装文件以.tar.gz或者.tgz为后缀,则说明该文件很可能是源码包,需要解压后再使用,具体步骤如下。
①使用tar命令将安装文件解压缩到当前目录下。
②使用ls命令查看解压出的目录。
③使用cd命令进入解压出的目录XXX。
④使用ls命令查看目录下的内容,可能会出现以下两种情况。
a.可见到软件的安装程序./install.pl,运行安装程序来安装软件。“.pl”通常是perl语言编写的程序名后缀。
b.可见到可执行程序configure,说明该安装包是c语言的源代码的,运行configure,通常会检测源码包及其当前系统环境,生成需要编译的文件列表。
⑤使用make命令编译该源码包。
⑥使用make install命令安装软件。

注意,若在步骤④出现第二种情况,则在安装过程中,每个命令的执行时间可能会较长,因此生产环境中经常使用./configure && make && make install命令逐一自动执行。下面以编译安装nginx的源码包为示例演示安装过程。
l 下载源代码包
首先下载nginx源代码,访问其官网www.nginx.org,获取源码下载链接,如下图所示:
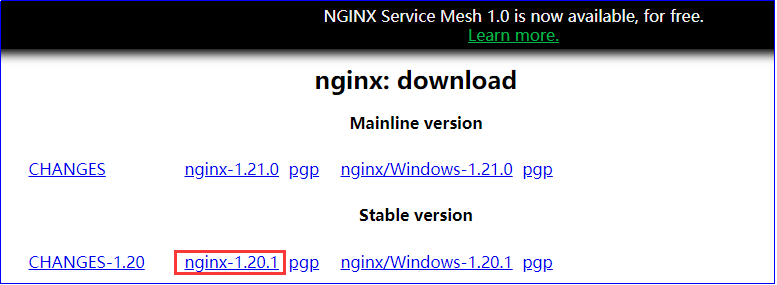

然后使用wget命令进行源码包的下载,相关操作如下:
[root@centos7 ~]# yum install wget
[root@centos7 ~]# wget http://nginx.org/download/nginx-1.20.1.tar.gz
--2021-06-21 10:28:23-- http://nginx.org/download/nginx-1.20.1.tar.gz
正在解析主机 nginx.org (nginx.org)... 3.125.197.172, 52.58.199.22, 2a05:d014:edb:5704::6, ...
正在连接 nginx.org (nginx.org)|3.125.197.172|:80... 已连接。
已发出 HTTP 请求,正在等待回应... 200 OK
长度:1061461 (1.0M) [application/octet-stream]
正在保存至: “nginx-1.20.1.tar.gz”
100%[======================>] 1,061,461 65.6KB/s 用时 14s
2021-06-21 10:28:38 (72.3 KB/s) - 已保存 “nginx-1.20.1.tar.gz” [1061461/1061461])
l 还原与解压源代码包
[root@centos7 ~]# tar -zxf nginx-1.20.1.tar.gz
[root@centos7 ~]# ls -ld nginx-1.20.1
drwxr-xr-x 8 1001 1001 158 5月 25 20:35 nginx-1.20.1
l 安装编译nginx源代码所缺失的软件包
如果现在开始编译安装nginx源码包会提示缺失编译器,如下所示。因此必须提前安装编译nginx所必须的各类软件包,否则会有报错信息并终止编译过程。
[root@centos7 ~]# cd nginx-1.20.1
[root@centos7 nginx-1.20.1]# ./configure --prefix=/usr/local/nginx
checking for OS
+ Linux 3.10.0-1160.31.1.el7.x86_64 x86_64
checking for C compiler ... not found
./configure: error: C compiler cc is not found
后续编译时还会提示系统缺失pcre、pcre-devel、zlib、zlib-devel等安装包,需要一并提前安装:
[root@centos7 nginx-1.20.1]# yum install pcre pcre-devel zlib zlib-devel
l 再次执行安装命令
然后再次运行configure程序,如下所示:
[root@centos7 nginx-1.20.1]# ./configure --prefix=/usr/local/nginx
........
Configuration summary
+ using system PCRE library
+ OpenSSL library is not used
+ using system zlib library
nginx path prefix: "/usr/local/nginx"
nginx binary file: "/usr/local/nginx/sbin/nginx"
nginx modules path: "/usr/local/nginx/modules"
nginx configuration prefix: "/usr/local/nginx/conf"
nginx configuration file: "/usr/local/nginx/conf/nginx.conf"
nginx pid file: "/usr/local/nginx/logs/nginx.pid"
nginx error log file: "/usr/local/nginx/logs/error.log"
nginx http access log file: "/usr/local/nginx/logs/access.log"
nginx http client request body temporary files: "client_body_temp"
nginx http proxy temporary files: "proxy_temp"
nginx http fastcgi temporary files: "fastcgi_temp"
nginx http uwsgi temporary files: "uwsgi_temp"
nginx http scgi temporary files: "scgi_temp"
l 执行编译命令进行编译
[root@centos7 nginx-1.20.1]# make && make install
l 启动nginx
| [root@centos7 nginx-1.20.1]# ll -d /usr/local/nginx/ drwxr-xr-x 6 root root 54 6月 21 11:03 /usr/local/nginx/ [root@centos7 nginx-1.20.1]# cd /usr/local/nginx/ [root@centos7 nginx-1.20.1]# pwd /root/nginx-1.20.1 [root@centos7 nginx-1.20.1]# cd /usr/local/nginx/ [root@centos7 nginx]# pwd /usr/local/nginx [root@centos7 nginx]# ll 总用量 0 drwxr-xr-x 2 root root 333 6月 21 11:03 conf drwxr-xr-x 2 root root 40 6月 21 11:03 html drwxr-xr-x 2 root root 6 6月 21 11:03 logs drwxr-xr-x 2 root root 36 6月 21 11:04 sbin [root@centos7 nginx]# sbin/nginx [root@centos7 nginx]# ss -tnl State Recv-Q Send-Q Local Address:Port Peer Address:Port LISTEN 0 128 *:22 *:* LISTEN 0 100 127.0.0.1:25 *:* LISTEN 0 128 *:80 *:* LISTEN 0 128 [::]:22 [::]:* LISTEN 0 100 [::1]:25 [::]:* [root@centos7 nginx]# |
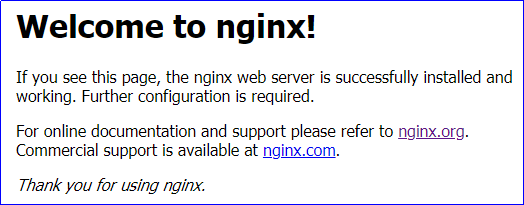
l 浏览器测试
当前安装主机的IP地址是:192.168.2.3,在浏览器中键入URL http://192.168.2.3/,返回的页面效果如下所示。至此nginx源代码编译的安装已经完成,可以开始使用编译安装的nginx web服务器软件了。


 [2023-08-17]
 1649
1649


